
How to clean and preserve suillus and bolete mushrooms
Views: 258
There’s something undeniably thrilling about heading into the forest and scanning the moss for that first flash of brown or bronze. Edible wild mushroom picking, or as many Europeans call it, mushroom hunting, is a centuries-old tradition that connects us to the land. For some, it’s a meditative stroll; for others, it’s a treasure hunt. And yes, there’s a particular joy (and envy from friends) in coming home with a bounty of wild mushrooms. But once your basket is full of porcini boletes or suillus mushrooms the real work begins.
Essential Guidelines
Mushroom Foraging Safety
- Only pick mushrooms you can identify with absolute certainty — some wild mushrooms are toxic or can cause gastrointestinal upset.
- Forage safely: learn the features, habitats, and look-alikes of edible species.
- Consider taking a foraging class, asking experienced foragers, or joining communities like the Mushroom Identification group on Facebook.
- Carry a trusted field guide such as All That the Rain Promises and More: A Hip Pocket Guide to Western Mushrooms.
- Golden rule: If you’re not sure, don’t pick!
Canning Safety
- Always use tested canning times, pressures, and ratios.
- Follow National Center for Home Food Preservation guidelines for soup processing — mushroom soups must follow soup standards, not standalone mushroom instructions.
- Any changes to ingredients, thickness, or ratios can affect safety.
- Keep the soup hot for hot-pack processing and follow all steps exactly.
- If your recipe differs from tested versions, freezing is the safer option.
- Refer to the trusted resources such as National Center for Home Food Preservation – Canning Soups; Mushrooms: Whole or Sliced, and Penn State Extension – Canning Vegetable and Mushroom Soups
What to Do After Foraging
There’s a certain magic to wild mushrooms. Anyone who has ever paid $15 for a bowl of porcini soup at a restaurant knows exactly what we mean. Those deep, earthy flavors are intoxicating, and for years many of us assumed they belonged only to fancy kitchens and professional chefs. But, things are changing. More and more of us are discovering what our grandparents and great-grandparents always knew: the forest provides.
So, one day you grab a basket, step into the forest, and return home with a bounty of wild mushrooms. You place your harvest on the counter, admire the beautiful caps, inhale the intoxicating aroma, and feel that warm surge of accomplishment every edible wild mushroom forager knows.
Then comes the “Now what?” moment. Because once you bring your first wild mushroom bounty home, you face the question: What do you do with them?
The foraging classes cover identification of poisonous and edible wild mushrooms but rarely teach you how to clean and preserve them. In this post, we focus on those missing steps, specifically for the spongy-pored mushrooms like boletes (king boletes porcini, and other boletes edilus) and suillus mushrooms.
Why focus on Boletes & Suillus (spongy pores mushrooms)
Boletes and Suillus mushrooms differ significantly from the commercially grown gilled mushrooms that most people are familiar with. Because of that, they often fall into the category of “unknown unknowns” for new wild mushroom foragers.
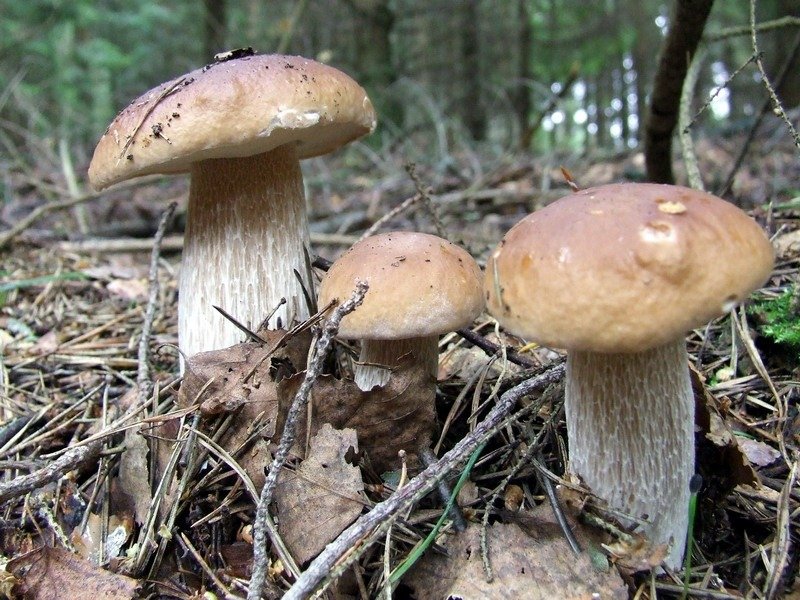
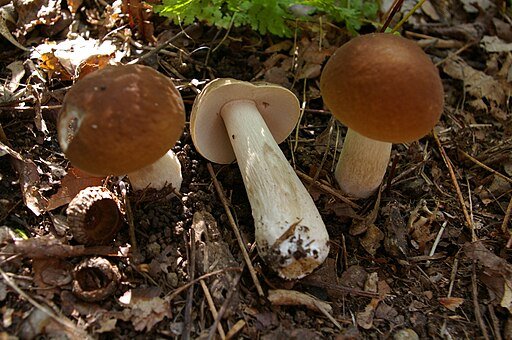
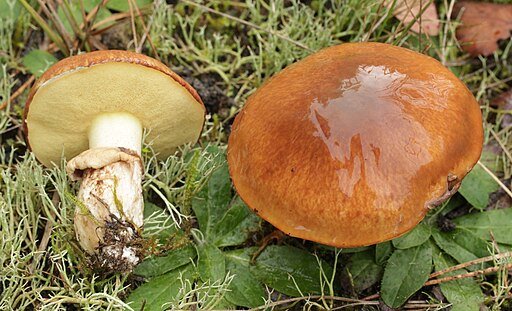
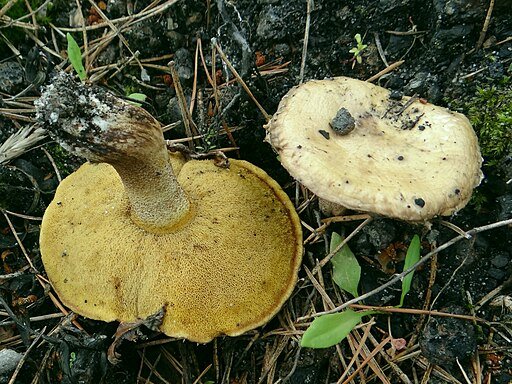
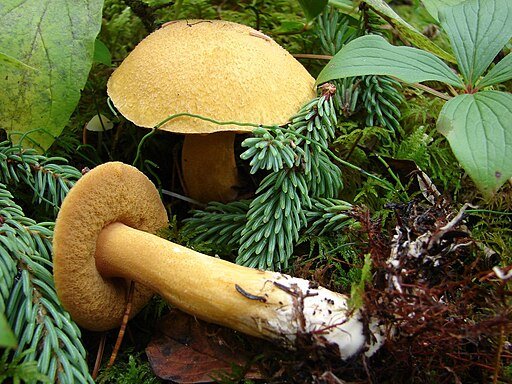
Unlike traditional mushrooms that have thin gills under the cap, Boletes and Suillus mushrooms have a sponge-like, porous underside. On the positive side, this unique characteristic makes them relatively easy to identify. However, the porous underside introduces some specific cleaning and preservation challenges. For instance, the sponge layer can trap dirt, forest debris, and occasionally insect larvae. Additionally, if not handled properly, this layer can become slimy when cooked or dehydrated. This occurs because the density and moisture content of these mushrooms vary much more than that of standard button mushrooms, meaning they respond differently to methods like drying, freezing, or sautéing. While Boletes and Suillus mushrooms require a bit of special care, once you understand their unique qualities, they can provide some of the most flavorful mushrooms to enhance your culinary creations.
Our mushroom cleaning philosophy – yes, we wash
Many bloggers suggest brushing wild mushrooms with a soft brush and avoiding water entirely. For example, a well-known food article warns:
“Once wet, mushrooms are nearly impossible to fully dry, which makes it less likely they’ll take on that coveted golden colour and those crispy edges…” Bon Appétit
Be that as it may, we take a different approach. Maybe it’s the MD background talking, or maybe it’s our East European habits, but we simply feel better giving wild mushrooms a quick rinse before cooking or preserving them. To be clear, we’re not soaking them in water or letting them swim for hours. Instead, we keep the process light and controlled.
After all, forest-picked boletes and suillus often come with bits of moss, pine needles, soil, insects and even wild life poop. Because of that, a brief wash helps us feel confident that what goes into the pot is clean, safe, and ready for the next steps.
Here is our recommended cleaning sequence, with sections dedicated to each key point:
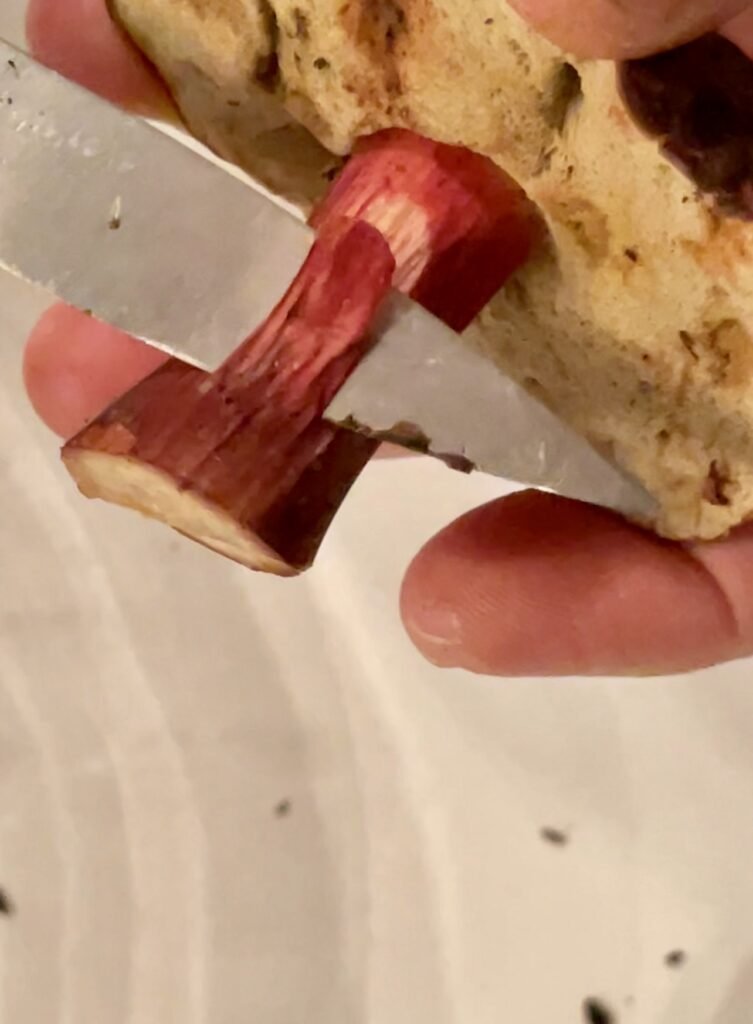
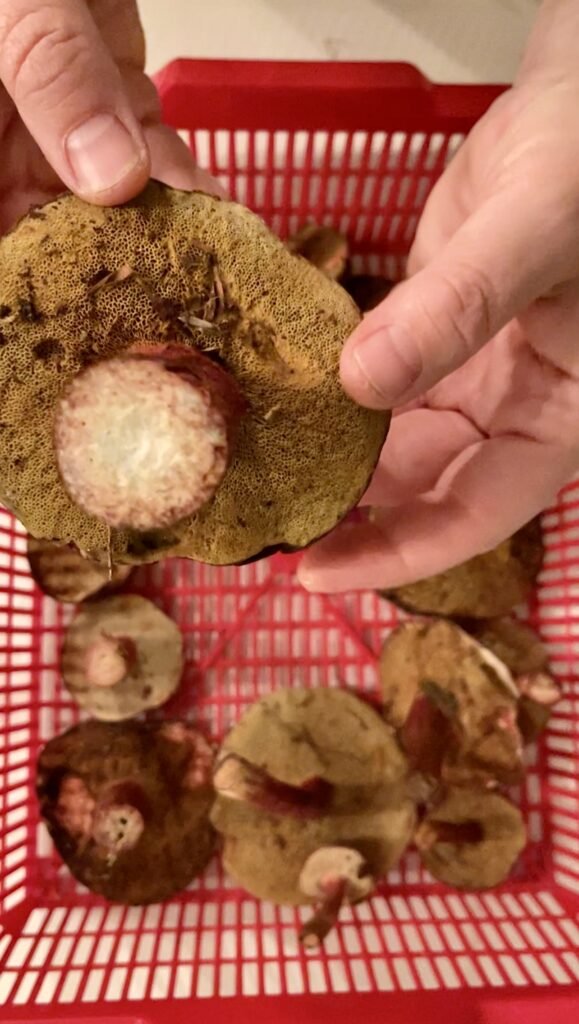
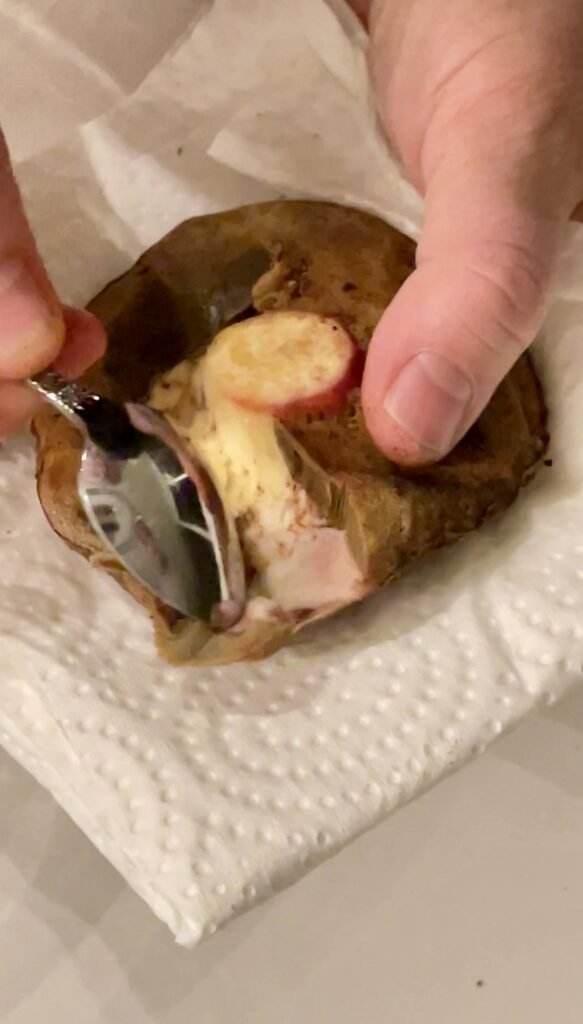
Step 1: Check mushrooms for bugs and larvae.
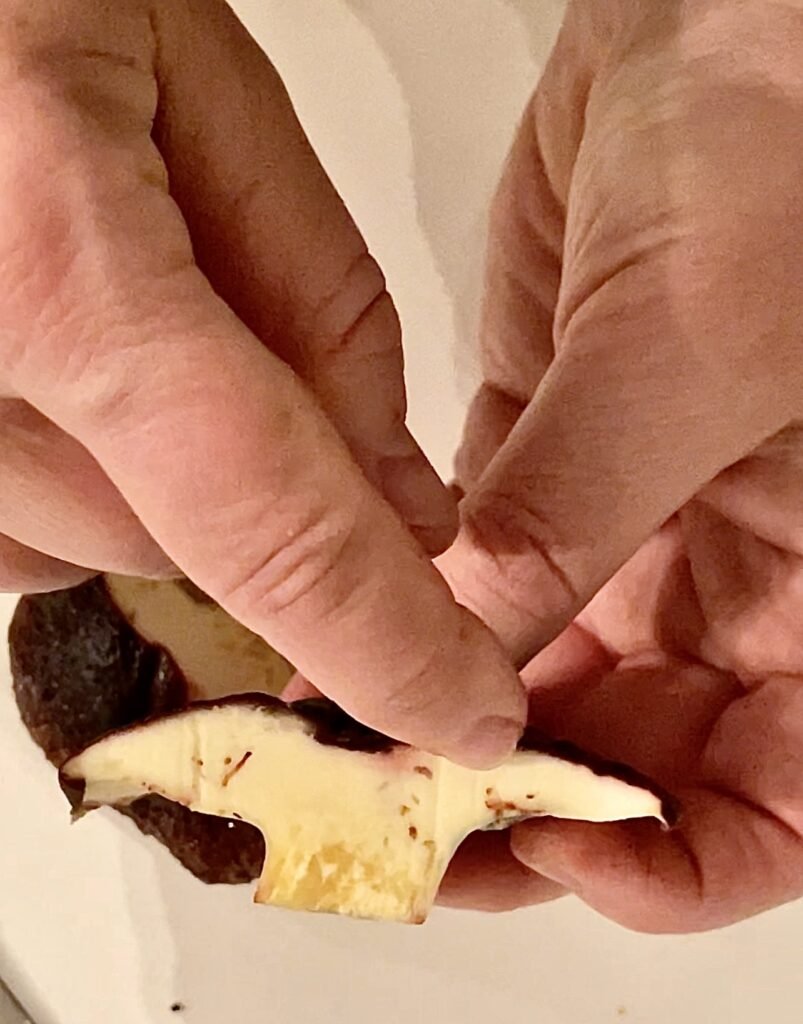
- Start by making a horizontal cut across the stem. Look for tiny brown dots or tunnels . These are signs of insect larvae. Next, trim upward until no tunnels remain. If your bolete or suillus is really infested, go ahead and remove the entire stem. Additionally, we recommend slicing the mushroom vertically to check inside the cup for any hidden guests.
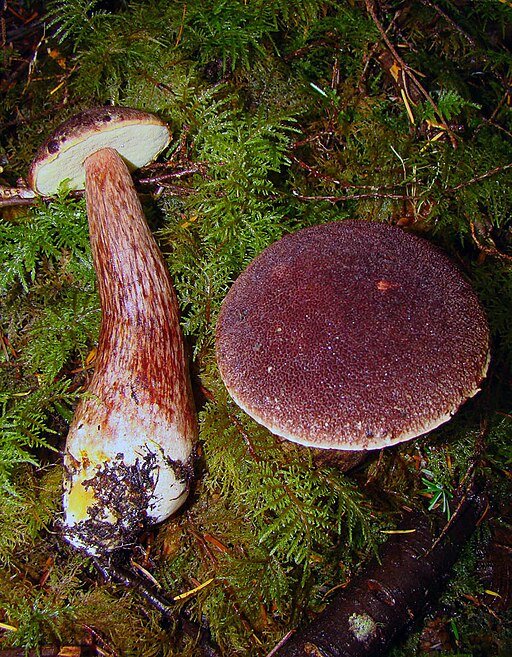
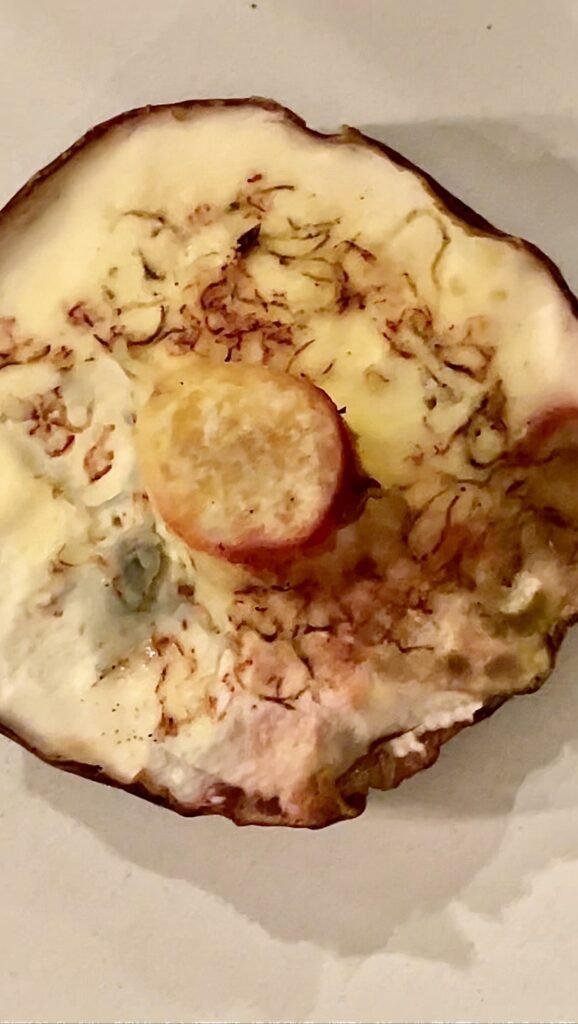
- Some species, like Zeller’s boletus, love to stash larvae in the sponge underneath the cap. Even if the stem looks perfectly clean, always check the pores. You might be surprised.
And now, for the honest part: some people consider larvae “just extra protein” and happily cook the mushrooms as-is. If you’re one of those persons, feel free to skip this step entirely. As for us… let’s just say our personal tolerance stops well before the maggot buffet stage.
Step 2: Remove the Sponge Layer (Some Boletes and Suillus)
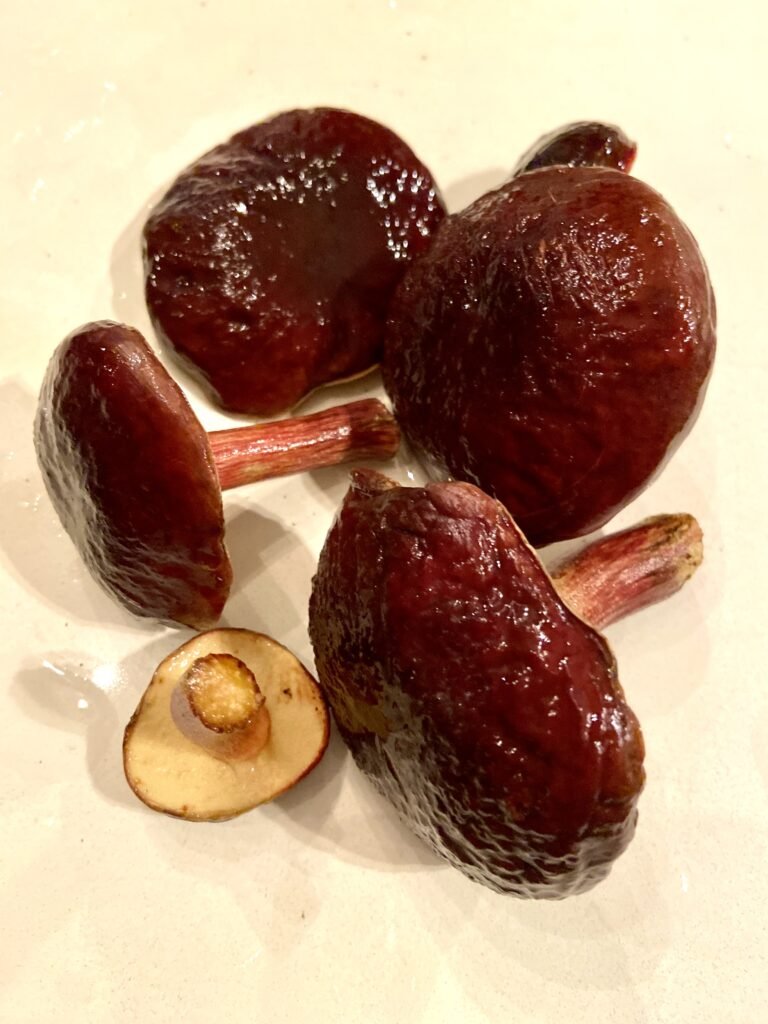
No, we’re not saying you should always trim the sponge layer. If you’re working with young suillus or bolete mushrooms, you usually don’t need to do this at all. However, for older suillus and boletes (including porcini) and for Zeller’s boletes of any age, we recommend giving the spongy underside of the cap a trim or even removing it entirely. There are a few reasons why you might want to do this:
- First, we’ve seen some pretty impressive insects infestations hiding underneath the sponge of the Zeller’s bolete mushrooms, even when the stem looked completely clean.
- Second, some folks believe the sponge layer can make mushrooms slimy when cooking or drying. We think sliminess comes from under-cooking or not drying boletes and suillus mushrooms properly before tossing them into a frying pan. But, to be honest, removing the sponge gives a nicer texture and a peace of mind that the unplanned protein didn’t make it in your meal.
Step 3: Peeling the Suillus Cap
For suillus mushrooms only, we follow our Ukrainian parents’ method and peel the sticky brown colored cap surface of the mushrooms.
Opinions vary: some say it hurts the flavor, others swear it improves texture and removes stubborn dirt. Also, some say that small suillus should not be peeled. Our personal preference is to always peel the suillus cup. If you are like us, this is how you do it:
- Start at the edge of the cap. Slip the tip of your knife under the thin, shiny skin.
- Lift gently. Once you get a small flap going, the skin will loosen. It’s a bit like peeling the label off a jar or lifting tape from a corner.
- Pull toward the center. Hold the mushroom steady and peel the skin inward toward the middle of the cap. Most of the time, it comes off in one neat sheet. Sometimes it tears – that’s okay, just keep going. Under the skin, you’ll find a clean, smooth white surface that’s much easier to work with. No more sticky layer hoarding pine needles and mystery crumbs from the forest floor.
That’s it! You’re left with a clean, non-sticky cap that cooks beautifully, dries more evenly, and freezes without gluing itself to everything around it.
Step 4: Lightly Peel or Trim the Stem
This step is a standard practice in much of Eastern Europe, but it’s often skipped in other parts of the world. At the end of the day, whether you peel or not is entirely up to you and your personal preferences.
- To peel the stem, use a paring knife to gently scrape or remove the outer stem layer. Sort of the same as you peel carrots.
Step 5: Wash or Wipe the Mushroom Clean
Next, we give the mushrooms a final clean. No, we’re not soaking them. We’re just giving them a quick rinse or wipe so they don’t bring half the forest into your pan. You have two options:
Option A: Quick Rinse
- Run cold water over the mushroom for a few seconds.
- Rub gently with your fingers or a soft sponge to remove any remaining dirt.
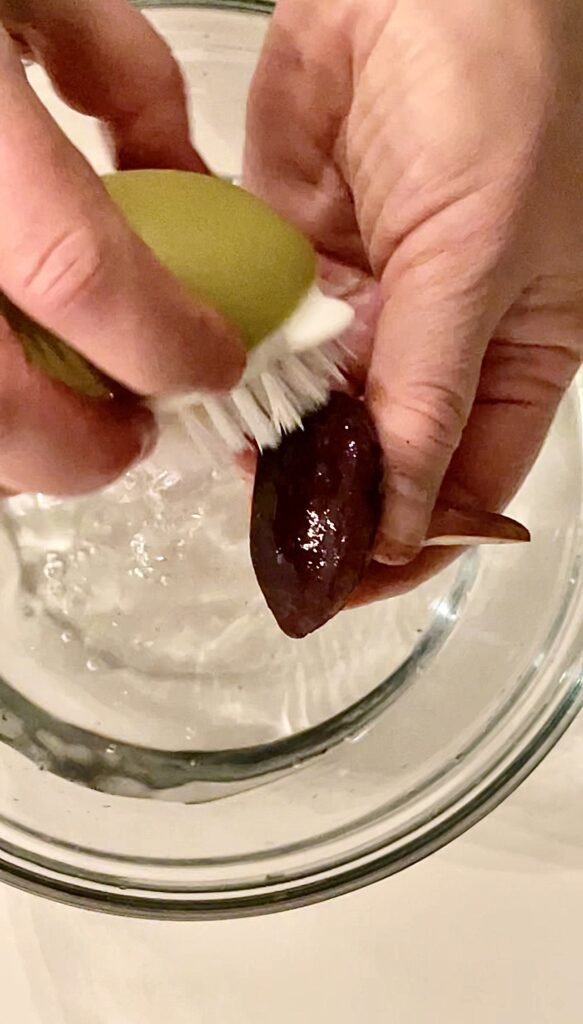
Option B: Damp Cloth or Brush (for drying later)
- Use a damp cloth, or wet soft brush.
- Wipe the cap, the stem, and any creases.
This keeps water absorption low, which is important if you plan to dehydrate them. Either way, the goal is simple: clean your wild mushrooms without waterlogging them.
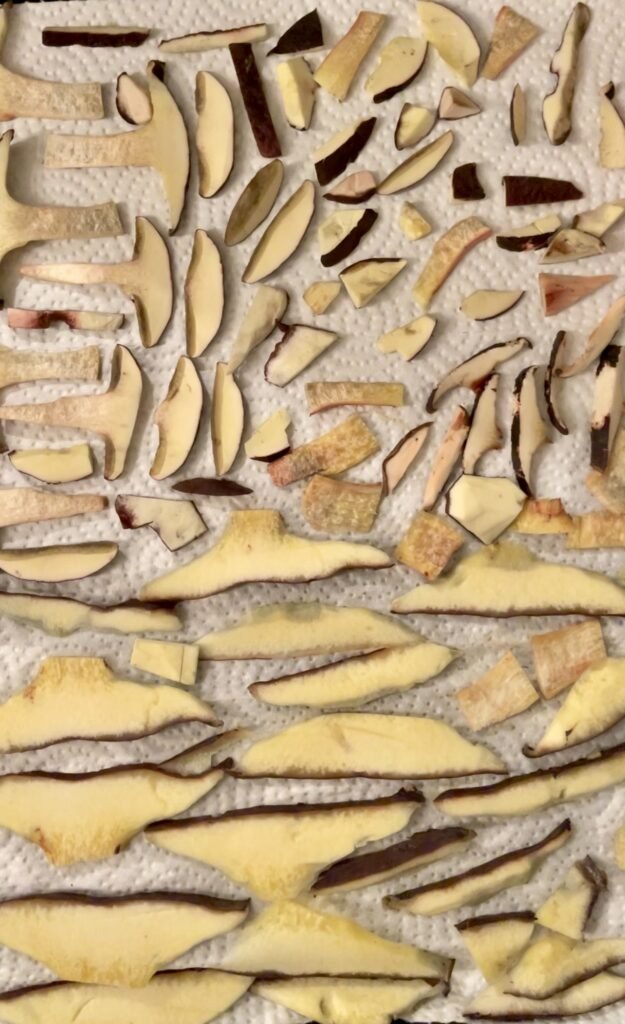
Step 6: Dry the Mushrooms After Washing
Once your mushrooms are trimmed, peeled, and washed, they need to dry off before cooking, freezing, or dehydrating.
Here’s the best way:
- Spread mushrooms on a clean kitchen towel or paper towels.
- Pat gently until there’s no visible moisture.
- Leave them out so excess water can evaporate.
- For sliced mushrooms, flip them once to dry both sides evenly.
Why this matters:
- Wet mushrooms don’t sauté or dehydrate. Instead, they steam.
- Excess moisture turns into ice and makes texture of frozen mushrooms mushy.
Bonus Step: Larvae Eviction (The Saltwater Method)
As we mentioned earlier, some people don’t mind larvae at all. Our brain says “no” and we discard the infested mushrooms. However, if you want to fight for your mushrooms, or if the infestation is mild enough that you can still stomach saving them, here’s a method to expel the unwanted guests.
- Mix 1 liter (1 quart) of water with 2 tablespoons of salt in a bowl.
- Add sliced mushrooms and soak for up to 30 minutes.
- Using a slotted spoon or a ladle strainer, lift out the mushrooms, drain, and pat dry.
- Hold your breath and take a look inside the bowl. You’ll notice a surprising number of larvae floating at the bottom.
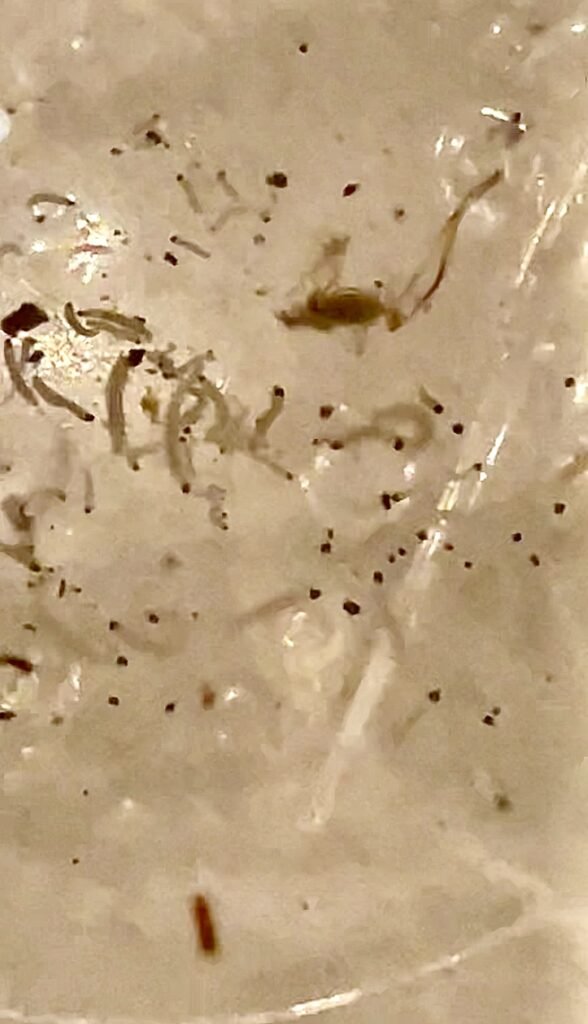
We didn’t believe this method actually worked until we tried it ourselves. When we saw what had collected in the bowl, the only thing we could say was “Eww.” After that, we examined the “purged” mushrooms… and let’s just say it didn’t look like all the bugs had left. And once we’d looked at the maggots in the bowl, we simply couldn’t convince ourselves to eat the purged mushrooms.
Preserving Wild Mushrooms for Year-Round Use
Freezing, drying, pickling and canning are all valid options used to preserve wild mushrooms. Pickling is one of the most popular method of preserving mushrooms in Eastern Europe.
We do not recommend mushroom pickling for the following reasons:
- Pickling often dilutes wild mushroom flavor. In our opinion, pickled porcini or bolete mushrooms taste just the same as any other pickled mushrooms. Basically, pickling these delicious wild mushrooms is a waste of their unique flavor and your hard work.
- From a safety standpoint, wild mushrooms often have higher moisture content, fungal complexity and insect infestation. A number of university extension services that work with NCFHFP caution about canning/pickling them.
- Texture of pickled or canned mushrooms leaves much desired. Pickled mushrooms tend to go rubbery or overly tangy.
However, if you are determined to can or pickle wild mushrooms, we recommend using verified recipes, such as those available on the Preserving Mushrooms page of The Oregon State University website.
Dry Sautéing Wild Mushrooms: What It Is and How to Do It
Dry sautéing is cooking mushrooms without added fat to evaporate moisture and concentrate flavor.
Instructions:
- Heat a non-stick skillet over medium heat.
- Add sliced mushrooms; stir occasionally.
- Cook until liquid evaporates and mushrooms lightly brown.
- Add a bit of oil or butter.
- Optionally add a bit of garlic.
- Cook for a couple of minutes
- Cool before freezing
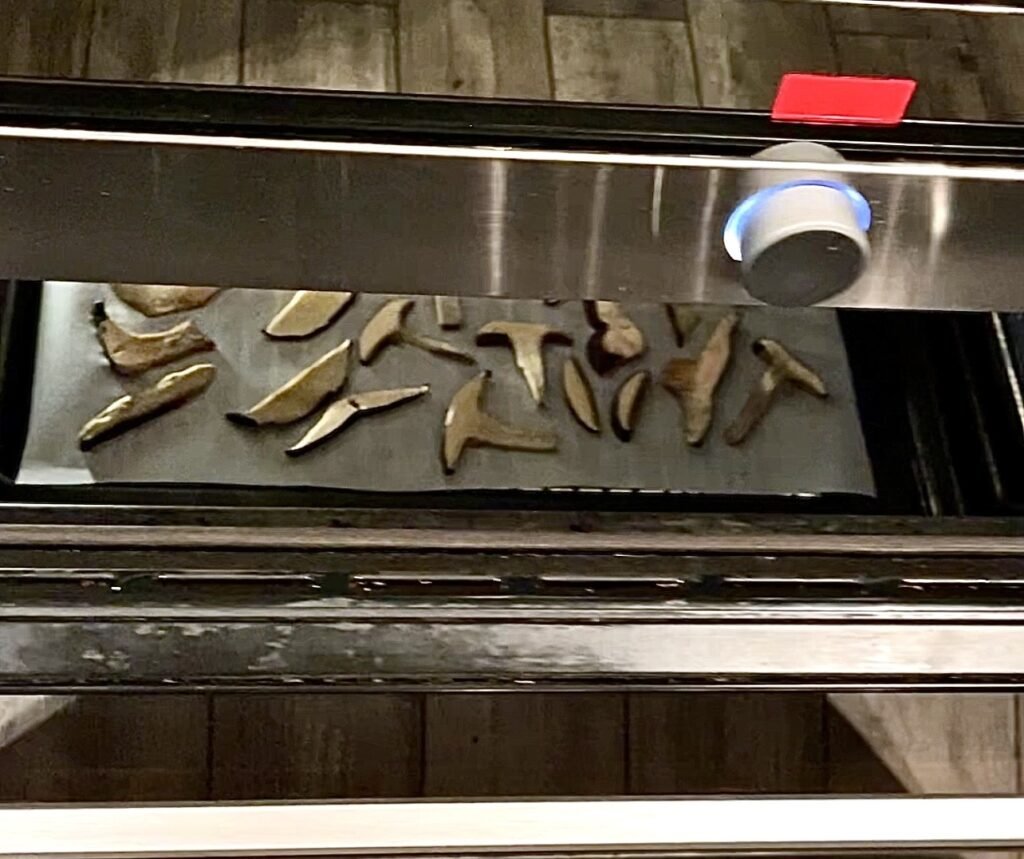
How to dry porcini, bolete and suillus mushrooms in the oven
Drying is one of the oldest and safest ways to preserve wild mushrooms. Dried boletes and porcini rehydrate beautifully for soups, sauces, and risottos, and the flavor actually intensifies during storage. If you have a dehydrator, follow the process outlined in your dehydrator manual. However, if you don’t have one, don’t despair, you can use your oven instead. These are the steps we recommend:
Preparation
- Slice mushrooms thinly — about 3 mm (0.118 inch) – 5 mm (0.19 inch) for drying. This allows for even and quick dehydration and prevents mold growth.
- Make sure your mushrooms are completely dry before you put them in the oven.
- LIne baking sheet with parchment
- Place mushroom slices on a tray in a single layer. Make sure they don’t overlap.
- Avoid: placing mushrooms directly on a solid baking sheet. They will steam, stick, and dry unevenly.
Temperature and Time
- Set your oven to its lowest setting – usually 100°F (40°C). Lower temperatures protect the mushroom’s natural aromatic compounds. However, if you need to speed up the drying process you can crank up the temperature a bit. But, make sure you never exceed 140°F (60°C). Also, beware – as you increase the temperature aromas begin to fade and “cook off”.
- If you’re using a convection oven, you can close the door. For a regular oven, keep it slightly ajar- about 30 cm (12 inches) to let the steam escape.
- Drying time varies depending on slice thickness and humidity, but it generally takes about 10 hours for thin slices and up to 20 hours for thicker ones.
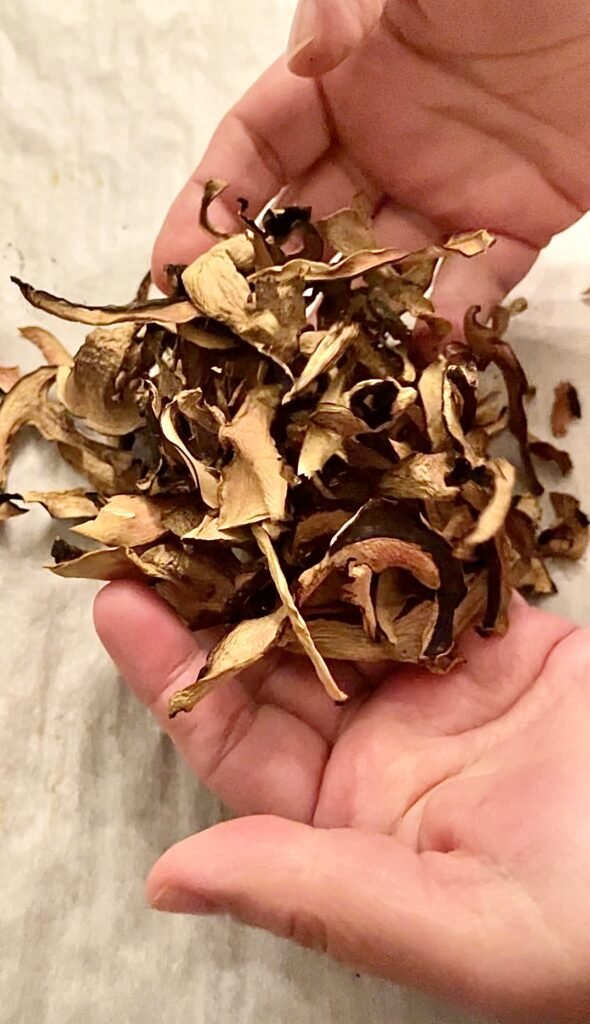
How to Tell It’s Done
- Mushrooms should be crisp and brittle, not leathery. If they snap easily, they’re ready.
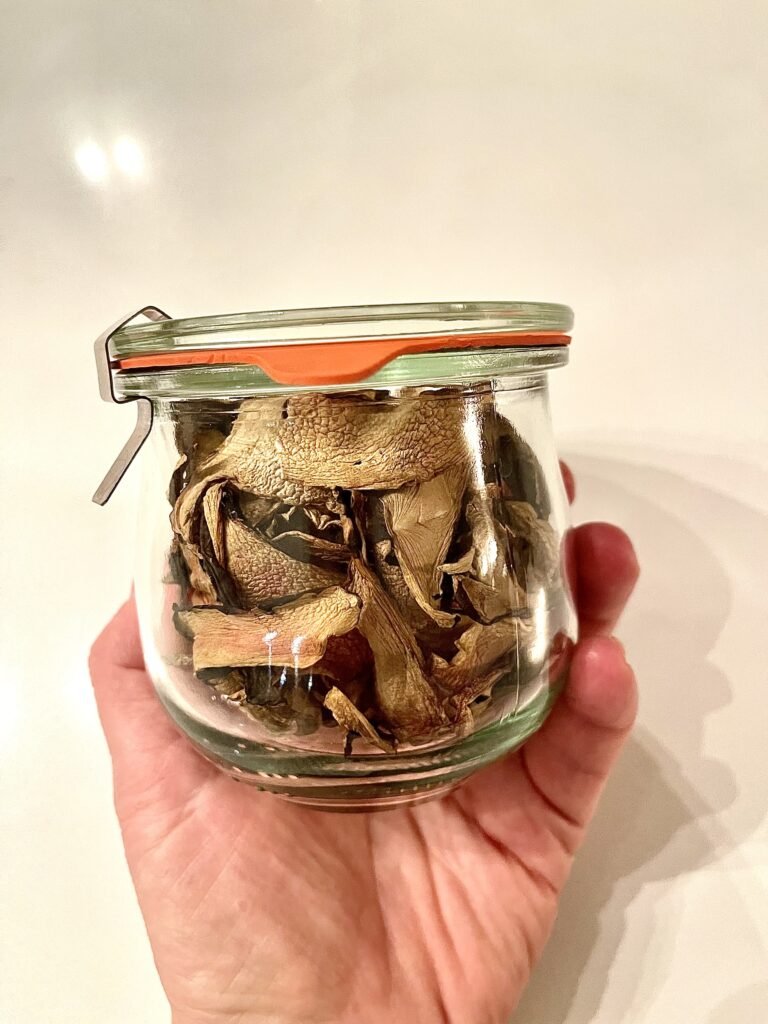
Storage
- Once completely cooled, store dried mushrooms in airtight glass jars or canvas bags, away from light and moisture.
- Never use plastic bags to store you dry mushrooms. Plastic bags trap moisture and can cause mushrooms to mildew. Properly dried boletes can last up to a year without losing their aroma.


Freezing mushrooms as ready-to-use portions
Sometimes you simply want to pick the mushrooms, clean them, cook them, then portion and freeze so that later you can easily defrost and add them to your dish (a soup, pasta, risotto, or sauce). Here’s how we do it:
- After cleaning and trimming (as above), you can either slice or dice the mushrooms.
- Cooling: Let the cooked mushrooms cool quickly, then portion them into freezer-safe containers. Be sure to label each container with the date and the mushroom species. Also, choose container sizes that allow you to use the entire portion in one go. Mushrooms don’t handle defrosting and refreezing well, so it’s best to freeze them in meal-ready amounts.
- Cooking method: We prefer to sauté the mushrooms until almost done. Use a little butter or oil, cook until most of the moisture has evaporated, this avoids mushy texture after freezing.
- Freezer storage: Store at 0 °F (-18 °C) or colder. Use within 6-12 months for best flavour.
- Future use: When ready, just defrost (or add frozen to a simmering dish) and incorporate into your meal. This is super convenient, because you’ve already done the hard work.
FAQs
I found small tunnels in a porcini stem – does that mean the mushroom is unsafe?
It’s not a sign that the mushroom is unsafe, but it is a sign of insect or larvae presence. You should trim until you remove the affected portion. If many tunnels remain, we recommend discarding or using the wild mushroom only for powdering/drying. Infestation does not automatically mean spoilage, but it does affect texture and aesthetic.
Can I store wild mushrooms fresh in the fridge for days before deciding what to do?
You can store mushrooms for a short period (1–2 days) in a fridge if mushrooms are kept cool and dry. Use paper bags or mesh containers for airflow and avoid sealed plastic. But the sooner you process them (trim/clean and either freeze or dry), the better the quality and flavour retention.
How can I use dried bolete, porcini and other dried wild mushrooms?
Dried mushrooms aren’t just a storage method. We consider them our pantry superpower. We use them whole, sliced, or powdered for a myriad of different cooking applications. This is how:
1. Rehydrate and cook with them.
- Soak dried mushrooms in warm water for about 30 minutes. Use the softened mushrooms in soups, stews, pasta dishes, risotto, stuffing, or casseroles. Don’t forget to strain and save the soaking liquid — it makes an amazing mushroom “stock.”
2. Grind them into mushroom powder.
Pop fully dried mushrooms into a spice grinder or blender and pulse into a fine powder. You can use mushroom powder to:
- flavor sauces and gravies
- boost soups and stews
- enrich risotto
- season roasted vegetables
- mix into breadcrumbs for cutlets or meatballs
- add depth to casseroles or slow-cooked dishes
3. Use powdered mushrooms as a “bulk filler” in soups.
If a soup needs a little more body or flavor, a spoonful of mushroom powder thickens it naturally and adds richness without extra cream or flour.
4. Add to rubs and marinades.
Mushroom powder pairs beautifully with pepper, garlic, and herbs for a savory meat or vegetable rub. Just make sure to cook the meat or vegetables thoroughly. Even in powdered form, wild mushrooms must always be cooked well.
How do I know the wild mushrooms are truly dry (for storage)?
They should be cracker-dry and brittle. If you bend a slice and hear a crisp snap (rather than a bend or slight moisture flex), you’re likely done. If any piece still feels pliable or soft you should return these to a drying sheet.
Can I just freeze raw wild mushrooms (no cooking)
Freezing raw wild mushrooms is possible but the texture after thawing will often degrade (especially for mushrooms with higher moisture, such as suillus and some of the soft pored bolete mushrooms. Heat-treating (steam or sauté) before freezing improves texture of the defrosted mushrooms significantly.
Keywords: how to clean mushrooms, wild mushrooms dried, edible wild mushrooms, king boletes porcini, boletus mushrooms, boletus dried, wild mushroom cleaning, drying wild mushrooms, freezing wild mushrooms, foraged mushrooms preservation, wild boletus preservation, wild suillus preservation, foraged mushroom cleaning tips

.jpg)
Leave a Reply